This page is optimized for desktop computers and tablets. To access it, try one of the following points:
- Access this page from a different device.
- If you’re on a tablet, rotate it.
- Check the “Desktop site” option in your browser settings.
This page is optimized for desktop computers and tablets. To access it, try one of the following points:
Callisto administrators cab access the Fax configuration by choosing System > Fax Lines from the main menu.
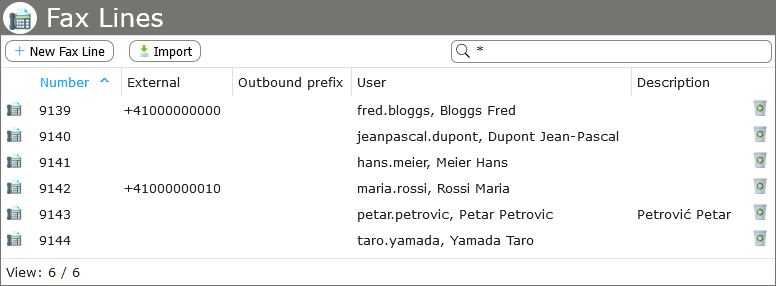
In this view, fax numbers can be configured and assigned to new users. Multiple users may be assigned to the same fax number. Depending on the configuration, incoming faxes will appear in the Callisto web GUI of the users that were assigned to the recipient fax number or sent to the corresponding users’ email accounts. Both in the web GUI and as email attachments, the fax message will be in either PDF or TIFF format.
The optional External parameter defines the outgoing fax number corresponding to the number.
The parameter Outbound prefix will be added to the dialed number on an outgoing fax.
Your selection will automatically be saved to the Cisco Unified Communications Manager Express.
For each new fax line, a separate dial peer has to be configured on the gateway. An example can be found in the user manual.
Entries can be deleted by clicking on the recycle icon.
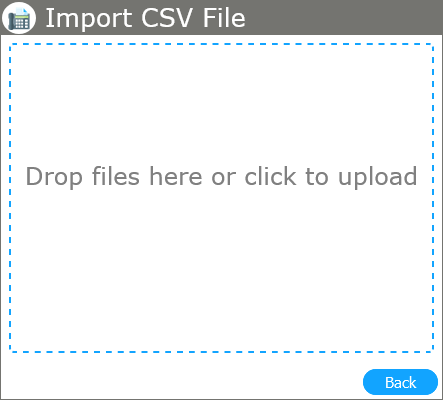
Click on the Import button to import multiple fax line entries by uploading a CSV file.
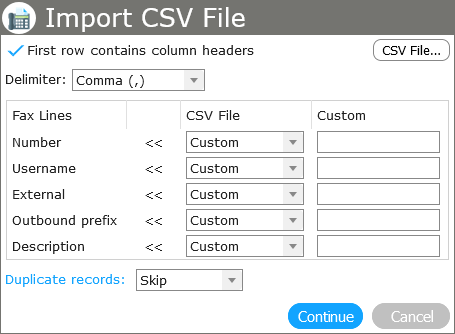
Select the proper Delimiter used in your CSV file. If the file’s first row consists of a header record, check First row contains column headers.
Select the fields that correspond to the data in your CSV file. The field Username will be used for logging into the user account.
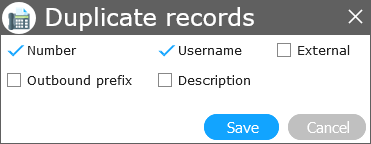
Clicking on Duplicate records gives you the option to determine records that already exist in your contact list. If you select multiple checkboxes, the records where all values are identical will be treated as duplicate records.
In the drop-down list to the right of Duplicate records, you can decide how to handle duplicates.
When you are ready, click on Continue and the import will start. Once the import is finished, a summary will be displayed.
Info: It is recommended to use the default values.
On a client PC, log in as an administrator and choose Downloads > Callisto Downloads. Select the file Callisto_Fax_Setup.exe, which will be opened locally or in the current folder, depending on your selection. Edit or install the file according to the setup instructions.
Start the Fax send application (FaxClientConfig.exe) and enter the following parameters:
Start Windows Fax and Scan by pressing Start (Win + Q), selecting Apps and clicking on the Windows Fax and Scan icon. Choose Tools > Fax Accounts…, click Add… and select Connect to a Fax Modem. Enter a name for the account, like Callisto Fax, and confirm by pressing Next. Select I’ll choose later; I want to create a fax now.
With this, the configuration is finished and faxes can be sent by selecting the installed Fax Printer Driver from any Microsoft program.
Info: Should incoming or outgoing faxes only partly transfer, the cause could be a synchronization problem on the gateway. This problem and its solution are described in the documentation of the Cisco High Density Voice/Fax Network Module (keywords: network-clock-participate, network-clock-select).
Freiburgstrasse 251
CH-3018 Bern
Switzerland
T: +41 31 531 11 11
F: +41 31 531 11 12
sales@ctmodule.com
Frankfurter Straße 92
D-65760 Eschborn/Frankfurt
Germany
T: +49 6196 2049173-0
F: +49 6196 2049173-9
sales-d@ctmodule.com
Gospodara Vučića 145
RS-11000 Belgrade
Serbia
T: +381 18 308076
sales@ctmodule.com