This page is optimized for desktop computers and tablets. To access it, try one of the following points:
- Access this page from a different device.
- If you’re on a tablet, rotate it.
- Check the “Desktop site” option in your browser settings.
This page is optimized for desktop computers and tablets. To access it, try one of the following points:
Callisto supports the Cisco Unified Communications Manager’s recording feature. In order to use it, the phones must be configured accordingly (see the CUCM configuration manual).
Warning: The Voice Recording feature can cause massive traffic to Callisto and take up many resources. Also, each recording uses a separate line license.
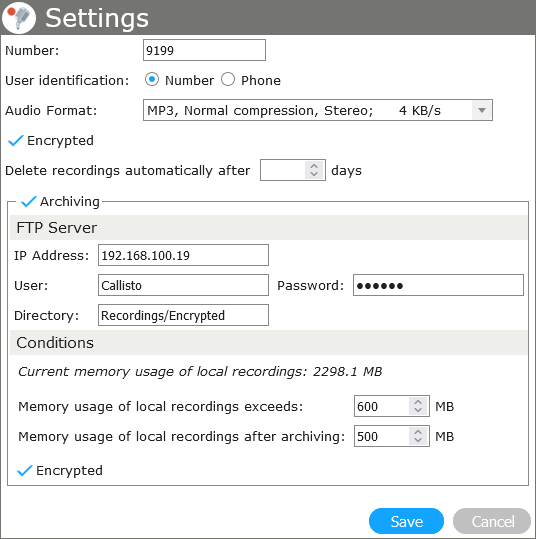
From the main menu, chose Voice Recording > Settings and enter the number for recording in the field Number. Use the same number as the Recording Destination Address set in the CUCM configuration. Select an Audio Format of your choice.
You can set a number of days after which recordings will be deleted automatically. Leave this field empty to store recordings indefinitely.
Info: If the automatic deletion of recordings is set at the general settings and at the user settings, the smaller value of both is used.
If Archiving is activated, you can define an FTP access and the Conditions under which recordings will be archived. You can also choose whether the archived data should be Encrypted.
Chose Voice Recording > Monitor Filter to define view filters for users. These filters restrict what recordings will be visible to individual users (while leaving the recordings themselves unaltered).
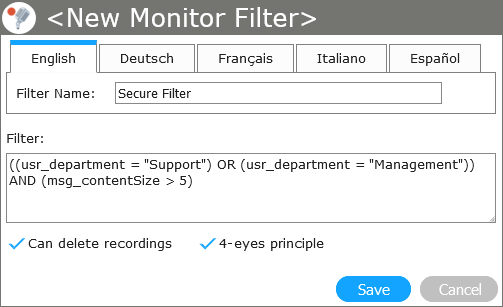
To define a new filter, choose New Monitor Filter and enter a Filter Name. You can define different names for each system language.
Enter the filter rules in the Filter text area. The filter uses SQL statements which are applied onto the Callisto database.
Example: A monitor filter for all people who work either in the support or management department, and have more than five messages.
((usr_department = 'Support') OR (usr_department = 'Management')) AND (msg_contentSize > 5)
| Name | Type | Example |
|---|---|---|
| usr_Name | string | 'paul.smith' |
| usr_LastName | string | 'smith' |
| usr_FirstName | string | 'paul' |
| usr_eMail | string | 'user@company.domain' |
| usr_PhoneMac | string | 'SEP002304342534' |
| usr_PhoneNumber | string | '1001' |
| usr_Department | string | 'support' |
| msg_Caller | string | '041315311111' |
| msg_LocalNumber | string | '1001' |
| msg_ContentSize (time in seconds) | number | 5 |
| msg_Direction | number | 0 (incoming); 1 (outgoing) |
To edit an existing filter, choose Voice Recording > Edit Monitor Filter and select the filter you want to modify.
Checking Can delete records gives users of this filter the permission to permanently delete recordings.
Checking 4-eyes principle will enforce the security mechanism of the two-man rule: A user can only view the recording if a second user who uses the same filter is present. After the first user opens the filter, a logon box will be displayed, prompting the logon of the second user.
Important: Only users with the setting Supervisor for 4-eyes principle enabled will be able to unlock a recording view (see below).
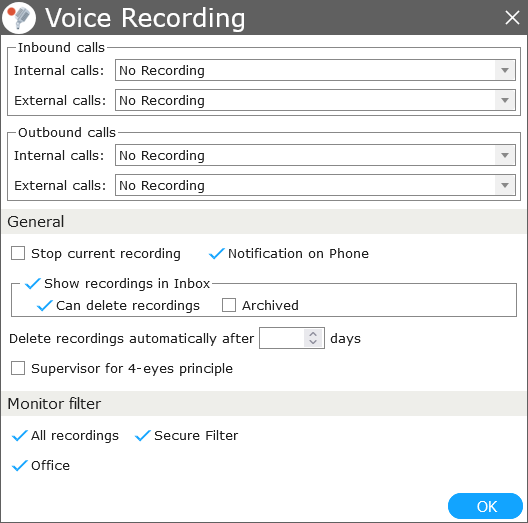
To enable voice recording and view filter for an user, choose User > Userlist, click a user’s name and go to Privileges. Check the privilege Voice Recording and click Choose….
Now you can activate the recording for different calls. The four types of calls are: inbound, outbound, internal and external calls.
Info: Internal calls are identified by the setting for internal numbers at System > System Parameter (see System parameters).
Info: Calls that are initial internal calls remain internal, regardless of an external transfer afterwards.
The recording feature is heavily dependent on the Callisto Unified Communications Manager configuration. You can define two recording options in Cisco UCM:
For more details on configuring Cisco UCM with Callisto, refer to the installation manual.
The direct URL for the Callisto Phone-Service is: http://<callisto>/Cisco/Recording.asp, with <callisto> being the IP address or domain name of your Callisto installation.
The call will not be recorded, regardless of the recording options in Cisco UCM. This is the recommended setting.
This option is only available if Automatic Call Recording is enabled in the Cisco UCM settings. With this option, the user can start the recording using a softkey or Cisco Service. This can be done during and at the end of a call; In both cases the entire call will be recorded. For more details on softkey configuration, refer to the Cisco UCM configuration manual.
In the General section, you can define the following options:
Voice recordings can automatically be deleted after a defined period of days. Leave this field empty to store recordings indefinitely. This will affect only the recordings of this user.
Info: The automatic deletion of recordings can be set both as a general setting (at Voice Recordings > Settings) and as a user setting (at Users > Userlist > user > Privileges > Voice Recording > Choose…). If both settings are active, the shorter time period will be applied.
In the section Monitor Filter, you can set the filters that will be visible on the user’s web GUI at Voice Recording.
Freiburgstrasse 251
CH-3018 Bern
Switzerland
T: +41 31 531 11 11
F: +41 31 531 11 12
sales@ctmodule.com
Frankfurter Straße 92
D-65760 Eschborn/Frankfurt
Germany
T: +49 6196 2049173-0
F: +49 6196 2049173-9
sales-d@ctmodule.com
Gospodara Vučića 145
RS-11000 Belgrade
Serbia
T: +381 18 308076
sales@ctmodule.com